Securely streamlining login and registration experience.
Rather than having to remember a API Keys, Cloudflare hooks allow your customers to authenticate using OAuth and start using the service without leaving the preview experience,
increasing the likelihood of an install or purchase.
Cloudflare apps that use accounts are required to use OAuth to maintain a consistent and secure flow during authentication.
Enabling login follows a standard OAuth 2.0 login flow where you provide Cloudflare Apps Service Creator with an OAuth Authentication URL, Token URL, Client ID, and Client Secret. The new service is now available to add as an account option into your install.json file:
{
  "title": "Google Account",
  "type": "object",
  "format": "account",
  "services": ["googleanalytics"],
  "required": true
}
Customers can then login by clicking the "New account..." button. Services are shared across apps, meaning
your customers can use the same account for all of your apps, should you choose to create more than one.
Account fields can also take multiple services, if your app supports that. This is useful if you, for
example, integrate with many mail services, and you only need the customer to authorize one.
We strongly suggest you add the ability to register an account to your OAuth pop-up window, allowing the
customer to choose to register an account if they don’t already have one. To make that easier we include
some information about the customer including their email address in the pop-up window’s URL.
Once the customer has authenticated you can ask that their Authorization Token be included with any WebHooks
we make to your system, allowing you to load data, perform actions on their account, or fetch information
which should be stored in the options to be included with the App. The Authorization
Token is, of course, never sent to the browser directly.
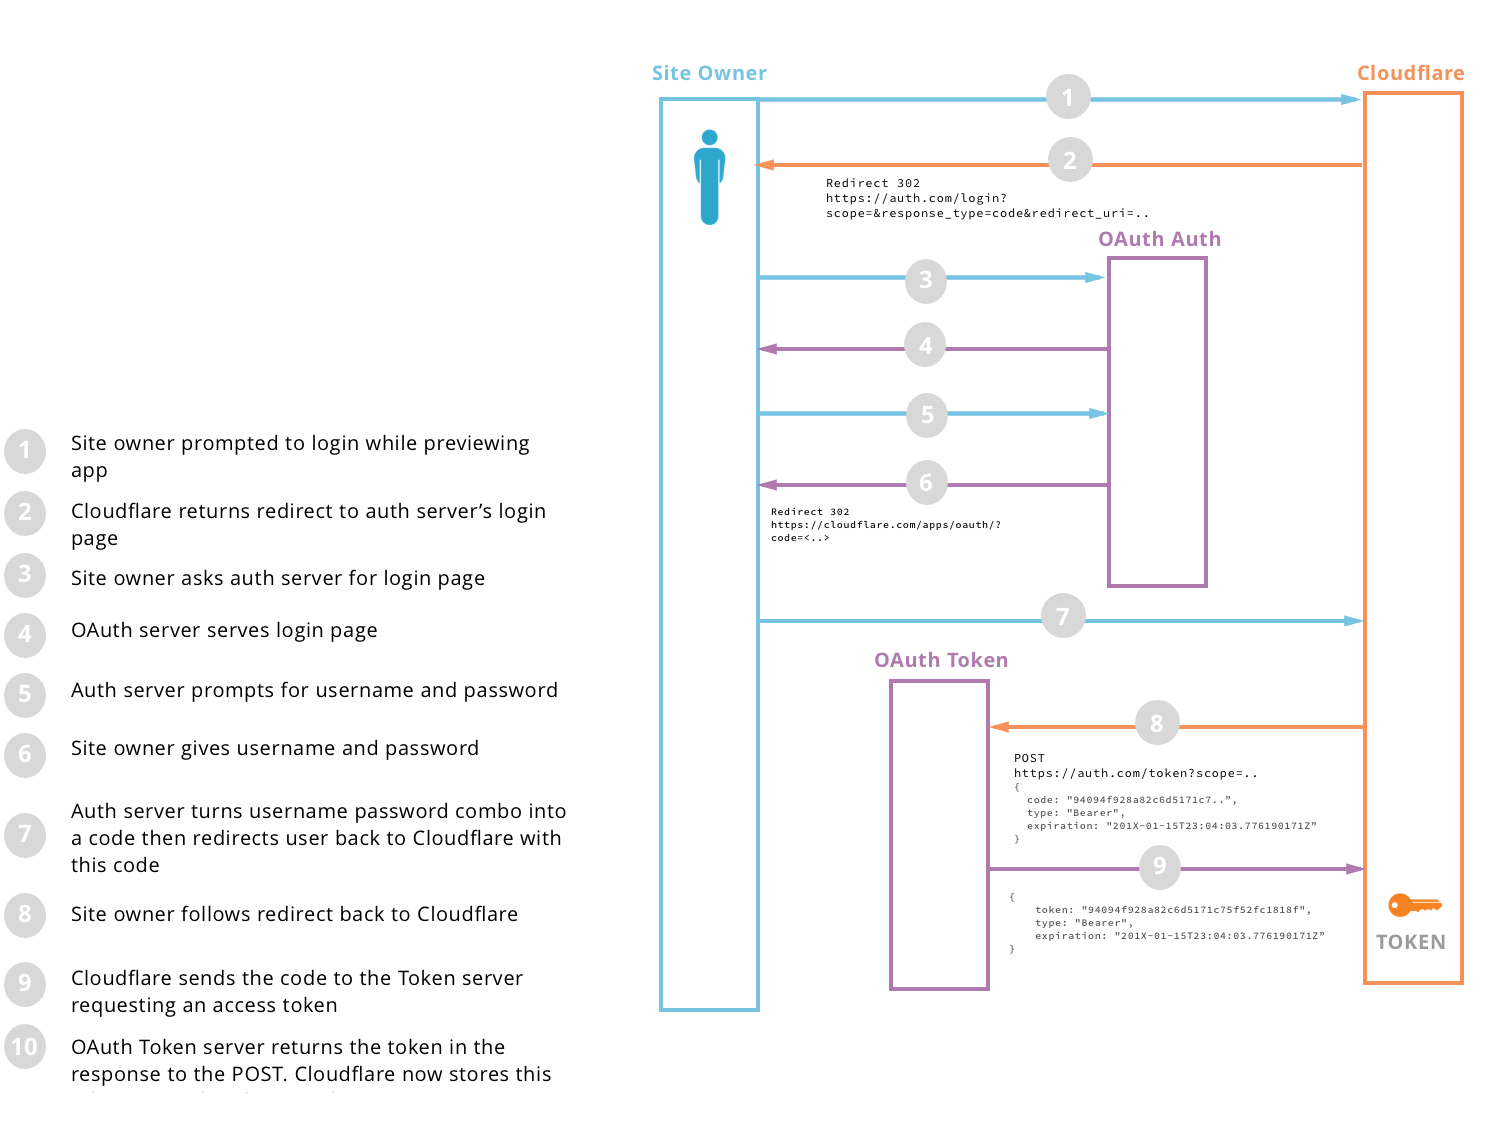
Login Flow
- The installing customer clicks the 'New account...' button in the account field of your app’s preview.
- We open a pop-up window at the OAuth Authentication URL you have provided us, providing you with
the Client ID and scopes you provided us.
- The customer authenticates, and you redirect the page to our Redirect URL (https://www.cloudflare.com/apps/oauth/)
with the customer’s Secret Code.
- We use the OAuth Secret you’ve provided us to turn that Secret Code into an Access Code by making
a request to your OAuth Token URL. Your OAuth Token response must contain an
access_token field that contains your generated authorization token.
- If your token doesn’t include the information we need to identify this account to the customer
(
username or email), we make a request to your Metadata URL with the authorized token to get
that information.
- All subsequent webhooks which specify the
authentications field will include the authorization token allowing you
to make authenticated requests.
Registration Flow
The registration flow is identical. If you have told us it’s available,
we expect you to support registration inside your OAuth dialog by giving the customer
the option to register if they don’t already have an account.
Here is a full list of the additional query parameters we will include if available:
user.emailsite.name (the domain of the website, like “example.com”)
We generally recommend you use these values as defaults,
allowing the customer to override them if they so choose.
Adding Login and Registration Support
Create a Service
Your service is represented by a Service record inside Cloudflare Apps. This record is not limited to
any single app, it can be reused by any of your apps which will need to login or register with your
service.
Begin by creating a new Service. The Service configuration page will expect various
details about your service such as its name and icon, and information about how we can login and register
accounts.
For help from our team, contact us on Stack Overflow or our Community with any questions about this process.
Add OAuth Endpoints
If you already support OAuth 2.0, you won’t
have to do much on your backend to add support to Cloudflare Apps login, but you will have to add a bit
to support registration. If you don’t already support OAuth, it may take a bit more time to add this
form of authentication to your tool.
As with other OAuth 2.0 providers, we need a pop-up we can show to the customer.
This pop-up is a HTML pages hosted on your website which we will open in a new window.
In the service creation page you can configure this pop-up to have the dimensions you prefer, up to 800x800.
We recommend dimensions of 600px high by 400px wide.
Our OAuth dialog guidelines
Once the customer has filled out the appropriate login or registration form in the pop-up,
you will provide us with a Secret Token which we will then turn into an Access Token using your Token URL.
If you do already have OAuth support, you may still need to add a bit to your pop-up to support registration.
If a customer doesn’t already have an account they should be presented with the option to register an account.
To make this easier, we will provide you with the customer’s email address and other metadata as query
parameters to the dialog.
It is easy for third-party integrations to get forgotten as you make changes to your tool.
For that reason we strongly recommend that you have some form of automated testing to verify that your endpoints work as you
make changes to your tool.
These tests can try logging in, converting a secret token to an access token, returning metadata,
and performing any other actions your tool does in response to our webhooks.
Add Account Field
As in the examples above, add an account field to your app, specifying the alias of your service. In the app
creator you will be able to see the field, but you will not be able to actually login or register unless you
have logged in to Cloudflare Apps.
Using your Authorization Token
The Authorization Token we are provided is not exposed to the browser session for obvious reasons (anyone
would be able to read the token who visited the installing customer’s website). Instead, it is available
to you in any subsequent Webhooks you choose to setup.
For example. you may have this WebHook (from the "hooks" section of your install.json):
{
  endpoint: "https://my-service.com/hook",
  events: ["new-install", "update-install", "option-change:account", "preview"],
  block: true,
  authenticate: ["account"], /* The name of the account options which should be authenticated */
  failure: {
    action: "notify",
    message: "There was an error communicating with My Service."
  }
}
This particular hook will fire before installs are made or updated, when previews are first started, and
anytime the account option is changed. If the account field is set, it will automatically include the
Access Token:
{
  event: "[The event name]",

  /* Other event information */

  authentications: {
    account: { /* The name of the option. */
      account: {
        /* Metadata about the account. */
      },
      token: {
        token: String, /* The access token you provided us. */

        /* Additional token information including the expiration date. */
      }
    }
  }
}
You can then use that Authentication Token to load information about the account and update the install options.
the customer can choose from or add option values which will be sent to the client. See the
WebHooks documentation for more information.
If you do update the install form, be sure to reset it if the customer logs out which will clear the account field and
its related authentication. Similarly, it can be wise to update any inserted options when the preview
event is fired, as the customer may be returning to your install form weeks or months later.
To show the account in the Cloudflare Apps UI we need an identifier such as the username or email associated
with the account. The OAuth spec does not require this information be included with Access Tokens, but
if you do chose to include it (we support username, user_id, userId and userid) we will use that.
If your tokens don’t include that information, you can provide us with a Metadata URL.
We will make a JSON GET request to this endpoint with the customer’s authorization token.
The Access Token will be included with the request as the Authorization header (prefixed with "Bearer "),
as in standard OAuth requests.
And we will expect a JSON response including any of this information:
{
  errors: [
    {
      type: String,
      message: String,
      fields: [String]
    },
  ],
  metadata: {
    username: String,
    userId: String || Number,
    email: String
  }
}
Showing metadata in the install preview is currently in development
and may not appear until App consent features are released.
There’s no need to include errors if there were none, and there’s no need to include fields in an error
if your error isn’t applicable to any specific fields.